Arch Linux
A simple guide for getting Arch running on ASUS laptops
Since it can be complicated to install arch, in case you don’t want even try archinstall, we also suggest trying:
- EndeavourOS as it feels more like a cohesive distro rather than a collection of software to install and configure.
- CachyOS since it has a very easy step-by-step guide, and it has an amazing out-of-the-box experience.
- Garuda is also pretty popular and has gained a fair share of users.
Every linux kernel past and including 6.19 has everything needed to provide a smooth experience, but it is advised to install a kernel from OGC.
If you own a ROG Ally or ROG Ally X ChimeraOS might be a good choice.
Content
Introduction
Read the Intro guide first to avoid bad surprises, especially if you plan to remove windows entirely.
Installation
To install Arch just follow the regular installation guide for the official archlinux or the procedure provided by your distro of choice.
The suggested bootloader is systemd-boot. Avoid using GRUB.
Also remember to install these:
# AMD systems
pacman -S linux-firmware amd-ucode
# Intel systems
pacman -S linux-firmware intel-ucode
choose either amd-ucode or intel-ucode depending on your CPU.
Note
If you are using the official archlinux read the article about vulkan and install whatever your iGPU might need.
Repository
OGC repo contains all the tools you need on a ROG laptop precompiled for you.
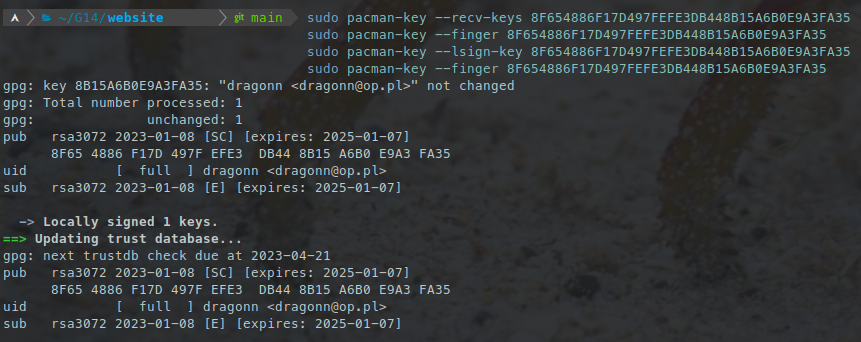
Before adding the repo you need to add the repo sign key to your pacman-key. Run the following commands to add it:
# Ayush key
sudo pacman-key --recv-keys F79100EF8C802DAB81C323BB8EEA5962FE510E19
sudo pacman-key --finger F79100EF8C802DAB81C323BB8EEA5962FE510E19
sudo pacman-key --lsign-key F79100EF8C802DAB81C323BB8EEA5962FE510E19
This should show output similar to this:
Tip
Have any problems ? Check if
/etc/pacman.d/gnupg/gpg.confdoesn’t have specified the keyserver or make sure it ishkp://keyserver.ubuntu.comIf you still have problems check if you are not running some active VPN connection, this does sometimes cause problems when fetching the server.
If you still have problems you can do it the less proper way by running those commands
wget "https://keyserver.ubuntu.com/pks/lookup?op=get&search=0xf79100ef8c802dab81c323bb8eea5962fe510e19" -O ogc.sec
gpg --show-keys ogc.sec
sudo pacman-key -a ogc.sec
Verify that the fingerprint shown by gpg --show-keys matches the one published on a trusted source before importing, HTTPS alone does not guarantee the key’s identity.
After that to get the repo add to your /etc/pacman.conf at the end:
[ogc]
Server = https://pacman.opengamingcollective.org
Once done you can then install from there asusctl, rog-control-center and the kernel. After adding the repo run a full system update before you go to install tools from the repo:
sudo pacman -Syu
Asusctl
Important
The recommended way to install asusctl is using the OGC pacman repo. Packages like asusctl-git from AUR aren’t supported. Also installing manually from cloned git isn’t supported
For installing asusctl run:
sudo pacman -S asusctl
asusd service is triggered by a udev rule after the keyboard driver is ready, the service doesn’t need to be enabled and is not supposed to be.
Important
Power profiles:
asusdmanages platform profiles and CPU EPP settings itself via the ACPIplatform_profileinterface. Running an external power profiles daemon (such aspower-profiles-daemonortuned) alongsideasusdcan cause race conditions over/sys/firmware/acpi/platform_profileand CPU EPP preferences. You have two options:
Let
asusdmanage profiles and disable the external daemon:sudo systemctl disable --now power-profiles-daemon.service sudo systemctl mask power-profiles-daemon.serviceKeep the external daemon and disable
asusd’s profile management by setting the following tofalsein/etc/asusd/asusd.ron:change_platform_profile_on_ac: false, change_platform_profile_on_battery: false, platform_profile_linked_epp: false,If you’re using an Arch-based distro you may already have power-profiles-daemon installed, as in CachyOS.
A common way to switch profiles is binding the
Fn+F5key toasusctl profile nextAvailable profiles vary by system, seeasusctl profile list.
Caution
Be aware that some functions or asusctl need kernel-level drivers support, take a look at the “Custom kernel section”
ROG Control Center
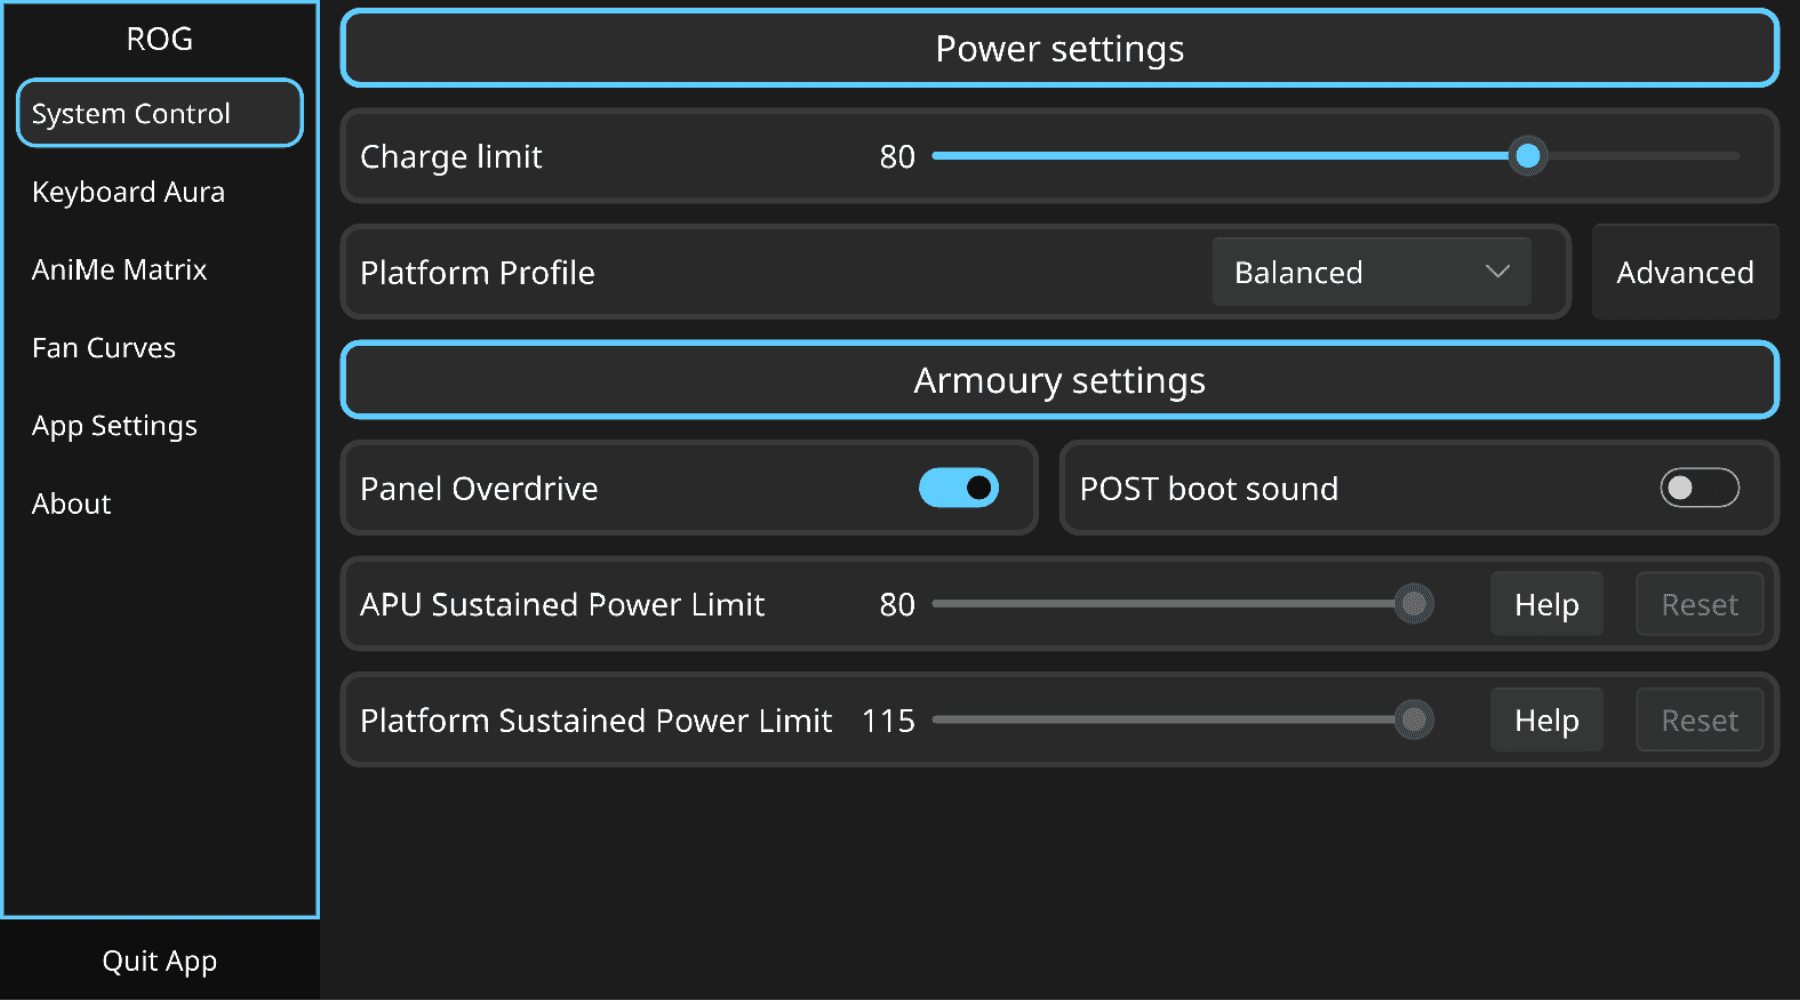
ROG Control Center is a GUI tool for configuring few aspects of asusctl.
sudo pacman -S rog-control-center
Graphics Switching
See GPU Switching for how to manage the dGPU and MUX.
Custom kernel - drivers fixes, hardware support
After Linux 6.19, you shouldn’t need a custom kernel. However, if you’re using an older version or if your device has a feature that hasn’t been included in the main kernel release yet, you can use the CachyOS kernel or the OGC kernel.
OGC kernel
The OGC kernel is the suggested kernel for end-users on arch and is shipped in the organization pacman repo. It can be installed with this command:
sudo pacman -Syu linux-ogc linux-ogc-headers
Caution
If you are using a custom kernel use a DKMS package for nvidia drivers:
nvidia-open-dkmsfor Turing and newer GPUs ornvidia-580xx-dkms(AUR) for Maxwell, Pascal, and Volta. The regular nvidia package works only with stock Arch kernel
After installing the new kernel you need to regenerate your boot menu or add a new boot entry depending on what boot manager you are using.
Systemd-boot
sudo mkinitcpio -P
Verify the new kernel entry appears in the boot menu before rebooting:
sudo bootctl list
Limine
sudo limine-update
Grub
sudo grub-mkconfig -o /boot/grub/grub.cfg
Tip
For others refer to their documentation/Arch Wiki page.
You can check currently booted kernel with command uname -r. It should give you for example:
7.2.0-rc7-1-ogc
Nvidia
If your laptop has an NVIDIA GPU, consider using the latest NVIDIA driver.
The driver package depends on your GPU generation:
- Turing and newer (GTX 16 series, RTX 20 series onward):
nvidia-open-dkms - Maxwell, Pascal, and Volta:
nvidia-580xx-dkms(AUR, the proprietary legacy driver is the only supported option for these generations)
Note
Some Ampere-equipped laptops may crash with the open driver due to GSP firmware issues, in that case use the proprietary driver instead.
Both are DKMS packages and work with custom kernels, while the regular nvidia package works only with the stock Arch kernel.
You should also install nvidia-laptop-power-cfg
git clone https://gitlab.com/asus-linux/nvidia-laptop-power-cfg.git
cd nvidia-laptop-power-cfg
makepkg -sfi
If you haven’t done already enable nvidia services:
systemctl enable nvidia-suspend.service nvidia-hibernate.service nvidia-resume.service
systemctl enable --now nvidia-powerd

# Only enable this if you plan to use the feature (unless you know exactly what it does don't touch it)
# systemctl enable nvidia-suspend-then-hibernate.service
After a reboot you should see the GPU turning on when needed and off when it’s not needed anymore.
Additionally you should query the status of your GPU with
cat /proc/driver/nvidia/gpus/bus_address/power
the bus_address will be different on each model, just use the autocompletion feature of bash spamming tab; the correct result is similar to this:
S0ix Power Management:
 Platform Support:          Supported
 Status:                    Enabled
If S0ix platform support is supported you want to ensure it is enabled: this is important for sleep and idle power consumption!
Make sure you also install the vulkan adapter for mesa as well:
# AMD iGPU
sudo pacman -S vulkan-radeon nvidia-utils vulkan-icd-loader
# Intel iGPU
sudo pacman -S vulkan-intel nvidia-utils vulkan-icd-loader
Other distributions based on Arch
EndeavourOS
When installing EndeavourOS do not use the option with the Nvidia drivers preinstalled. That driver only works with the stock kernel. Use the default install option then install the DKMS package matching your GPU post-install: nvidia-open-dkms for Turing and newer GPUs or nvidia-580xx-dkms (AUR) for Maxwell, Pascal, and Volta.
Secure Boot
Arch
On Arch Linux, the easiest way is to use sbctl.
Note
For derivates, you can use the AUR package sbctl-dracut-conf or limine-dracut-support to quickly configure the system for secure boot.
Install that package, put your laptop in Setup Mode > Advanced Mode (F7) > Security, Secure Boot > Expert Key Management > Reset To Setup Mode on the UEFI menu and boot into archlinux, then issue:
sudo sbctl create-keys
sudo sbctl enroll-keys --microsoft
Grub bootloader
You can follow the wiki for more information.
Systemd-boot bootloader
In systemd-boot, you need to sign several files, which will depend on your specific setup, but the following commands should cover most cases. However, you can check the wiki to be sure.
sudo sbctl verify | sed -E 's|^.* (/.+) is not signed$|sbctl sign -s "\1"|e'
sudo sbctl sign -s -o /usr/lib/systemd/boot/efi/systemd-bootx64.efi.signed /usr/lib/systemd/boot/efi/systemd-bootx64.efi
Then it is best to reinstall the kernel and ensure it got signed.
# use the following command depending on your initramfs generator
# dracut (provided by sbctl-dracut-conf)
sudo dracut-regen
# mkinitcpio
sudo mkinitcpio -P
Limine bootloader
Limine has its own mechanism for signing the bootloader and kernels; check the wiki for more details like dracut or mkinitcpio, but it should be very simple.
Limine UEFI since 11.2.0 requires to enable automatic config checksum enrollment, set the following line in /etc/default/limine (provided by limine-dracut-support or limine-mkinitcpio-hook):
ENABLE_ENROLL_LIMINE_CONFIG=yes
Then run the following commands to enroll the config and update the bootloader:
sudo limine-enroll-config
sudo limine-update
Verify signed files
You have to ensure the bootloader is signed too, otherwise the UEFI won’t load it and display you an error message about insecure OS being prevented to be loaded.
To check signed files you have to use
sudo sbctl verify
sudo sbctl verify
  Verifying file database and EFI images in /boot...
  ✗ /boot/EFI/BOOT/BOOTIA32.EFI is not signed
  ✗ /boot/EFI/BOOT/BOOTX64.EFI is not signed
  ✗ /boot/EFI/Linux/arch-linux.efi is not signed
  ✓ /boot/EFI/Linux/f1710a77781f46bcb9be1b9221102a38_linux.efi is signed
  ✓ /boot/EFI/limine/limine_x64.efi is signed
  ✗ /boot/vmlinuz-linux is not signed
In this case, I use limine along with UKI, which signs only a few files, but in principle it should be the bootloader and kernel-related files that should be signed, otherwise the system won’t boot.
After the first reboot your laptop will automatically exit setup mode and secure boot will work.
You can check it using this command:
sbctl status
  Installed:      ✓ sbctl is installed
  Owner GUID:     a9fbbdb7-a05f-48d5-b63a-08c5df45ee70
  Setup Mode:     ✓ Disabled # this should be disabled after the first reboot
  Secure Boot:    ✓ Enabled
  Vendor Keys:    microsoft
This is a do-and-forget thing: once the initial setup is done no manual intervention is needed and every new kernel will be automatically signed.
Warning
WARNING This is Arch’s official method; derivatives may vary, as in the case of CachyOS, so it is advisable to consult the wiki or forums for the respective Arch derivative.
CachyOS
To enable Secure Boot on CachyOS, please follow the CachyOS Secure Boot Setup guide.